4个技术点
点一
阿里云配置放入配置文件统一管理
1.注入外部配置文件中的配置项的两种方式?
@Value //一个属性一个属性的注入
@ConfigurationProperties //批量将多个属性注入bean对象中
2.两种方式各自的使用场景?
如果属性较少,建议@Value注入
如果属性较多,考虑复用,建议使用
以上是该功能需要背过记住的两个注解★★★
代码如下:
#阿里云OSS                                                 //配置文件application.yml
aliyun:
  oss:
    endpoint: https://oss-cn-beijing.aliyuncs.com
    bucketName: java-426-ai
    region: cn-beijing
@Component         //配置阿里云,后面上传图片放在阿里云OSS上存储   //工具类AliyunOSSOperator
public class AliyunOSSOperator {
    @Autowired
    private OperatorPropertie operatorPropertie;
    //修改一:改成自己的OSS服务器中的bucket对应的域名中
    //private String endpoint = "https://oss-cn-beijing.aliyuncs.com";
    //修改二:改成自己的OSS服务器中的bucket名称
    //private String bucketName = "java-426-ai";
    //修改三:改成自己的OSS服务器所属区域
    //private String region = "cn-beijing";

    /*优化
        为了方便统一管理   配置少的时候可以用@Value来读取配置文件中的值
        @Value("${aliyun.oss.endpoint}")
        private String endpoint;
        @Value("${aliyun.oss.bucketName}")
        private String bucketName;
        @Value("${aliyun.oss.region}")
        private String region;
     */

    /*  用@configpro注解
        需要单独来一个配置类,然后使用get方法获取配置文件中的值
     */
    public String upload(byte[] content, String originalFilename) throws Exception {

        String endpoint = operatorPropertie.getEndpoint();
        String bucketName = operatorPropertie.getBucketName();
        String region = operatorPropertie.getRegion();

        // 从环境变量中获取访问凭证。运行本代码示例之前,请确保已设置环境变量OSS_ACCESS_KEY_ID和OSS_ACCESS_KEY_SECRET。
        EnvironmentVariableCredentialsProvider credentialsProvider = CredentialsProviderFactory.newEnvironmentVariableCredentialsProvider();

        // 填写Object完整路径,例如202406/1.png。Object完整路径中不能包含Bucket名称。
        //获取当前系统日期的字符串,格式为 yyyy/MM
        String dir = LocalDate.now().format(DateTimeFormatter.ofPattern("yyyy/MM"));  //2025/04
        //生成一个新的不重复的文件名
        String newFileName = UUID.randomUUID() + originalFilename.substring(originalFilename.lastIndexOf("."));
        String objectName = dir + "/" + newFileName;

        // 创建OSSClient实例。
        ClientBuilderConfiguration clientBuilderConfiguration = new ClientBuilderConfiguration();
        clientBuilderConfiguration.setSignatureVersion(SignVersion.V4);
        OSS ossClient = OSSClientBuilder.create()
                .endpoint(endpoint)
                .credentialsProvider(credentialsProvider)
                .clientConfiguration(clientBuilderConfiguration)
                .region(region)
                .build();

        try {
            ossClient.putObject(bucketName, objectName, new ByteArrayInputStream(content));
        } finally {
            ossClient.shutdown();
        }

        return endpoint.split("//")[0] + "//" + bucketName + "." + endpoint.split("//")[1] + "/" + objectName;
    }

}
@Data                                           //处理读取方式的前缀的工具类 OperatorPropertie
@ConfigurationProperties(prefix = "aliyun.oss")//prefix 前缀
@Component
//@ConfigurationProperties 读取方式
public class OperatorPropertie {
    private String endpoint;
    private String bucketName;
    private String region;
}
点二
删除员工数据的功能
1.@RequestParam("形参变量") //只要有参数,就必须加在Controller请求方法的参数上加上这个
2.@Transactional("rollbackFor = Exception.class") //service方法上开启事务管理,一起成功一起失败
3.@Param("形参变量") //只要有参数,就必须在Mapper方法参数上加这个
4. <delete id="deleteByIds">
        delete from emp where id in
        <foreach collection="ids" item="id" open="(" separator="," close=")">
            #{id}    //id处是mapper中的删除方法。collection是mapper方法的形参。
        </foreach>   //item是变量名随便取值 open separator close三个属性需要记住
    </delete>        //foreach记住!!!
以上是该功能需要背过记住的四个点★★★★★
功能分析
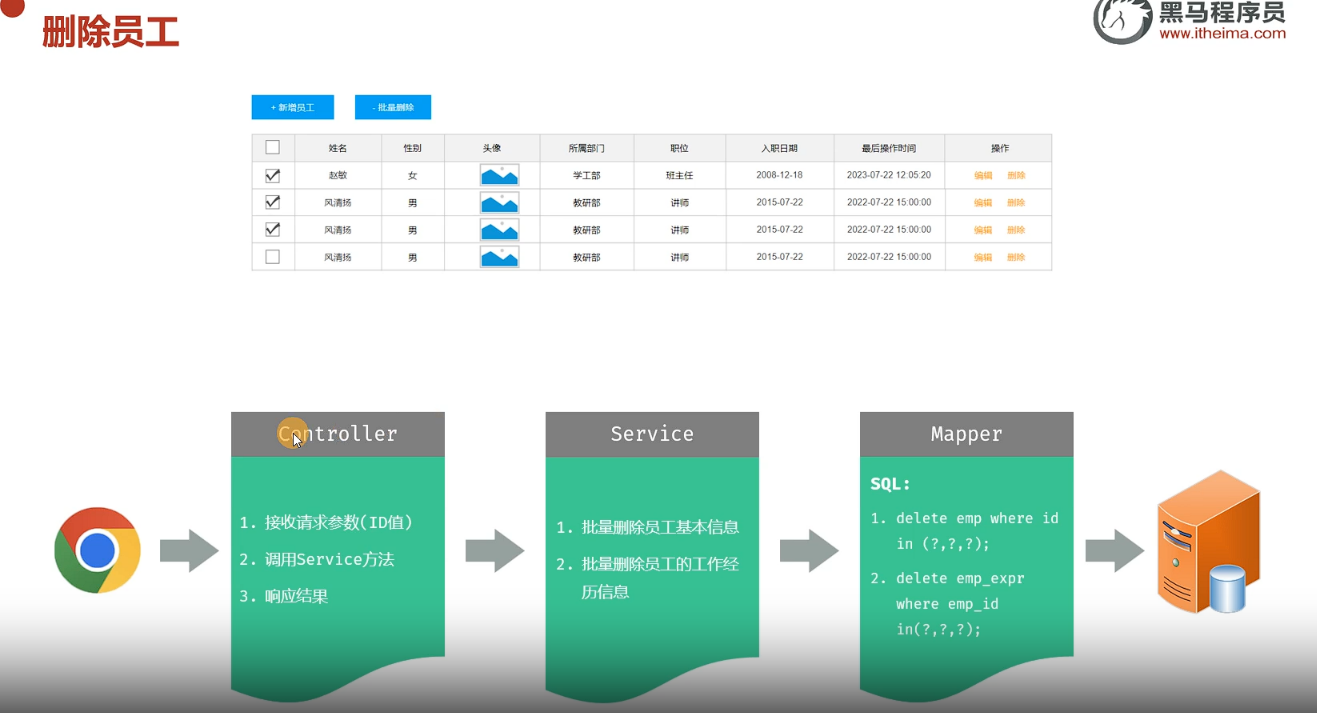
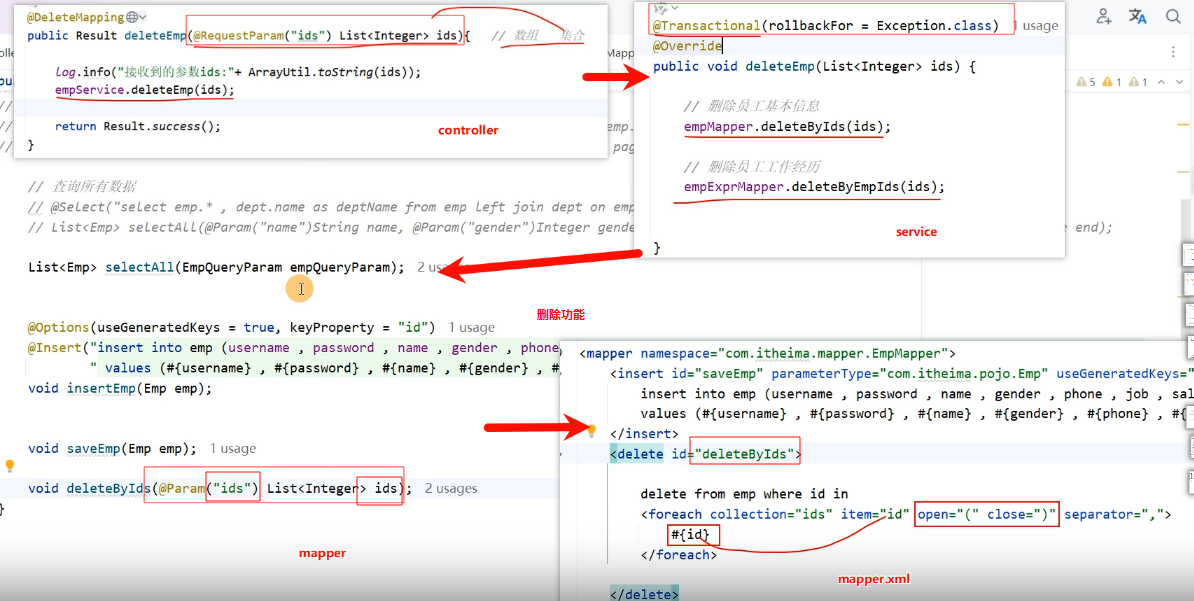
具体实现代码如下:
/**
 * 三、批量删除 员工请求                                               Controller
 * @param ids
 * @return
 */
@DeleteMapping("/emps")
public Result deleteEmp(@RequestParam("ids") List<Integer> ids)
{  //数组  集合都行
   empService.deleteEmp(ids);
   return Result.success();
}
/**
 * 批量删除员工的业务功能                                               Service
 *                                                                         impl
 * @param ids
 */
@Transactional(rollbackFor = Exception.class)
@Override
public void deleteEmp(List<Integer> ids) {
    //删除员工基本信息
    empMapper.deleteByIds(ids);
    //删除员工工作经历
    empExprMapper.deleteByEmpIds(ids);
}
/**
 * 删除员工数据                                                        Mapper
 * @param ids                                                              interface
 */
void deleteByIds(@Param("ids") List<Integer> ids);
                                                                    //ExprMapper
void deleteByEmpIds(@Param("ids") List<Integer> ids);
<delete id="deleteByIds">                               //emp.xml
    delete from emp where id in
    <foreach collection="ids" item="id" open="(" separator="," close=")">
        #{id}
    </foreach>
</delete>

<delete id="deleteByEmpIds">                            //empexpr.xml
      delete from emp_expr where emp_id in
    <foreach collection="ids" item="id" open="(" separator="," close=")">
            #{id}
    </foreach>
</delete>
点三
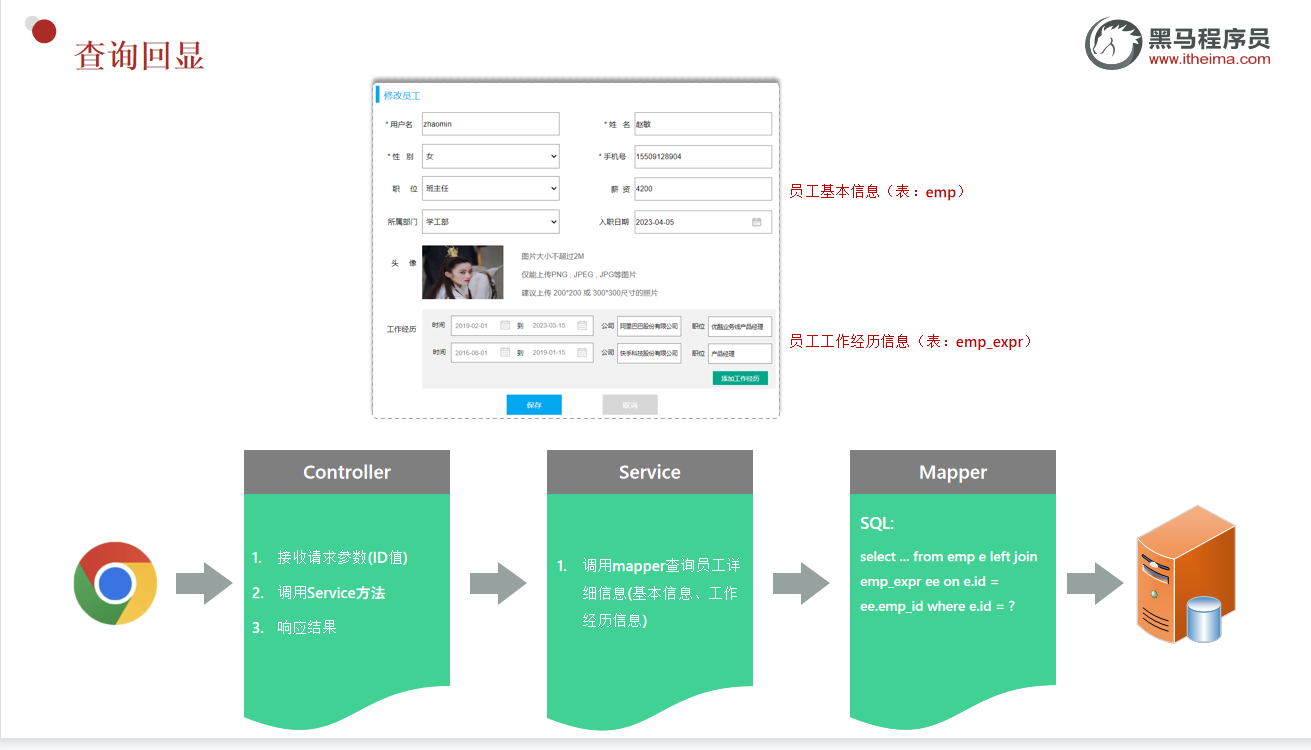
修改员工数据的功能
1.员工数据用emp和emp_expr俩表存储的,员工信息用Emp实体类返回而员工经历需要特殊处理(实体封装的集合)
 <resultMap id="baseEmpMap" type="com.itheima.pojo.Emp">
        <id column="id" property="id"/>         //员工信息可以用实体类Emp中的基本属性来接收
        <result column="username" property="username"/>
        <result column="password" property="password"/>
        <result column="name" property="name"/>
        <result column="gender" property="gender"/>
        <result column="phone" property="phone"/>
        <result column="job" property="job"/>
        <result column="salary" property="salary"/>
        <result column="image" property="image"/>
        <result column="entry_date" property="entryDate"/>
        <result column="dept_id" property="deptId"/>
        <result column="create_time" property="createTime"/>
        <result column="update_time" property="updateTime"/>
                                                //员工经历则需要用Emp中的exprList集合来接收
        <collection property="exprList" ofType="com.itheima.pojo.EmpExpr">
            <id column="ee_id" property="id"/>
            <result column="ee_company" property="company"/>
            <result column="ee_job" property="job"/>
            <result column="ee_begin" property="begin"/>
            <result column="ee_end" property="end"/>
            <result column="ee_empid" property="empId"/>
        </collection>
    </resultMap>

    <select id="getEmpWithEmpExprById" resultMap="baseEmpMap">
        SELECT e.*,   //(俩表)有些属性对不上:故记住mybatis提供的方案:属性的特殊处理resultMap★★★
               ee.id      ee_id,
               ee.emp_id  ee_emp_id,
               ee.begin   ee_begin,
               ee.end     ee_end,
               ee.company ee_company,
               ee.job     ee_job
        FROM emp e
                 LEFT JOIN emp_expr ee ON ee.emp_id = e.id
        WHERE e.id = #{id}
    </select>
@注解可以抽出请求路径更方便
@PathVariable("") //接收路径参数的注解 ★
2.修改员工数据
动态sql的标签,动态sql能够让对应的功能更加灵活扩展性高
 <!--  修改员工信息  -->
    <update id="updateById">
        update emp
    <!--   优化修改功能: 只修改几个时用if来判断一些情况让修改功能更加灵活更有扩展性     -->
    <!-- set标签的作用是: 消除sql语句中的,   -->
        <set>
            <if test="username != null and username !=''">username=#{username},</if>
            <if test="password != null and password !=''">password=#{password},</if>
            <if test="name != null and name !=''">name=#{name},</if>
            <if test="gender != null">gender=#{gender},</if>
            <if test="phone != null and phone !=''">phone=#{phone},</if>
            <if test="salary != null">salary=#{salary},</if>
            <if test="job != null">job=#{job},</if>
            <if test="image != null and image !=''">image=#{image},</if>
            <if test="entryDate != null">entry_date=#{entryDate},</if>
            <if test="deptId != null">dept_id=#{deptId},</if>
            <if test="updateTime != null">update_time=#{updateTime},</if>
        </set>
        where id=#{id}
    </update>
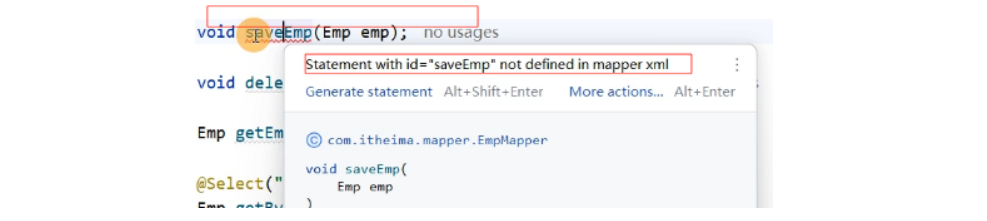
注意: 当mapper中的方法上没有加sql注解来操作数据库的话
就需要在mapper.xml文件中配置sql语句(一般处理较复杂的情况)
小技巧: 点mapper方法左侧的小鸟即可快速移动到mapper.xml修改属性的方法名(文件太多时不容易乱)
以上是总结今天修改功能学到的两个点和遇到的问题小技巧
下面是功能的具体实现:
    /**                                             Controller
     * 四、修改员工信息 ->1.数据回显(映射回显)
     * @param id
     * @return
     */
    @GetMapping("/emps/{id}")
    public Result getByID(@PathVariable Integer id){
        Emp emp = empService.getEmpWithExprById(id);
        return Result.success(emp);
    }

        //2.修改请求->修改
    @PutMapping("/emps")
    public Result updateEmp(@RequestBody Emp emp) throws Exception {
        empService.updateEmp(emp);
        return Result.success();
    }
    /**
     * 修改员工信息:
     * 一次性把员工基本信息和员工工作经历都查询出来
     *
     * @param id
     * @return
     */
    @Override
    public Emp getEmpWithExprById(Integer id) {
        return empMapper.getEmpWithEmpExprById(id);
    }

        /**
     * 修改员工信息:
     * 修改的逻辑->先删除后新增
     *
     * @param emp
     */
    @Override
    @Transactional(rollbackFor = Exception.class)
    public void updateEmp(Emp emp) {
        //1.更新员工的基本信息
        emp.setUpdateTime(LocalDateTime.now());
        empMapper.updateById(emp);

        //2.删除此员工的工作经历
        Integer id = emp.getId();
        empExprMapper.deleteByEmpIds(Arrays.asList(id));

        //3.新增此员工的工作经历
        if (!CollectionUtils.isEmpty(emp.getExprList())) {
            emp.getExprList().forEach(empExpr -> empExpr.setEmpId(id));
            empExprMapper.insertBatch(emp.getExprList());
        }
    }
//映射回显 empmapper
Emp getEmpWithEmpExprById(Integer id);
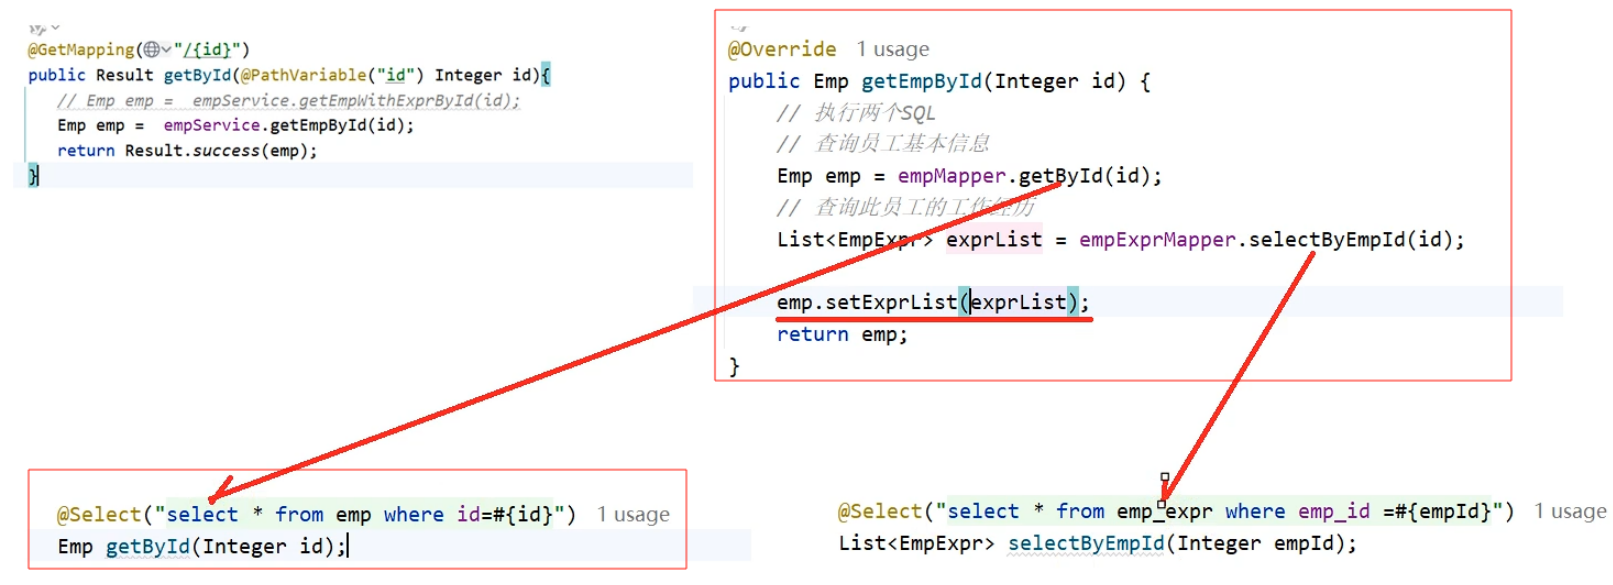
//简单回显
// @Select("select * from emp where id=#{id}")
// Emp getById(Integer id);
void updateById(Emp emp);
 <!--  修改员工信息                               empmapper.xml-->
    <update id="updateById">
        update emp
    <!--   优化修改功能: 单个修改时更加灵活更有扩展性     -->
    <!-- set标签的作用是: 消除sql语句中的,   -->
        <set>
            <if test="username != null and username !=''">username=#{username},</if>
            <if test="password != null and password !=''">password=#{password},</if>
            <if test="name != null and name !=''">name=#{name},</if>
            <if test="gender != null">gender=#{gender},</if>
            <if test="phone != null and phone !=''">phone=#{phone},</if>
            <if test="salary != null">salary=#{salary},</if>
            <if test="job != null">job=#{job},</if>
            <if test="image != null and image !=''">image=#{image},</if>
            <if test="entryDate != null">entry_date=#{entryDate},</if>
            <if test="deptId != null">dept_id=#{deptId},</if>
            <if test="updateTime != null">update_time=#{updateTime},</if>
        </set>
        where id=#{id}
    </update>
修改-的回显功能还有第二种方法更简单一些,具体可以对比一下想用哪个都行
动态sql方法

俩sql的方法
 [![]
[![]
功能思路

点四项目异常

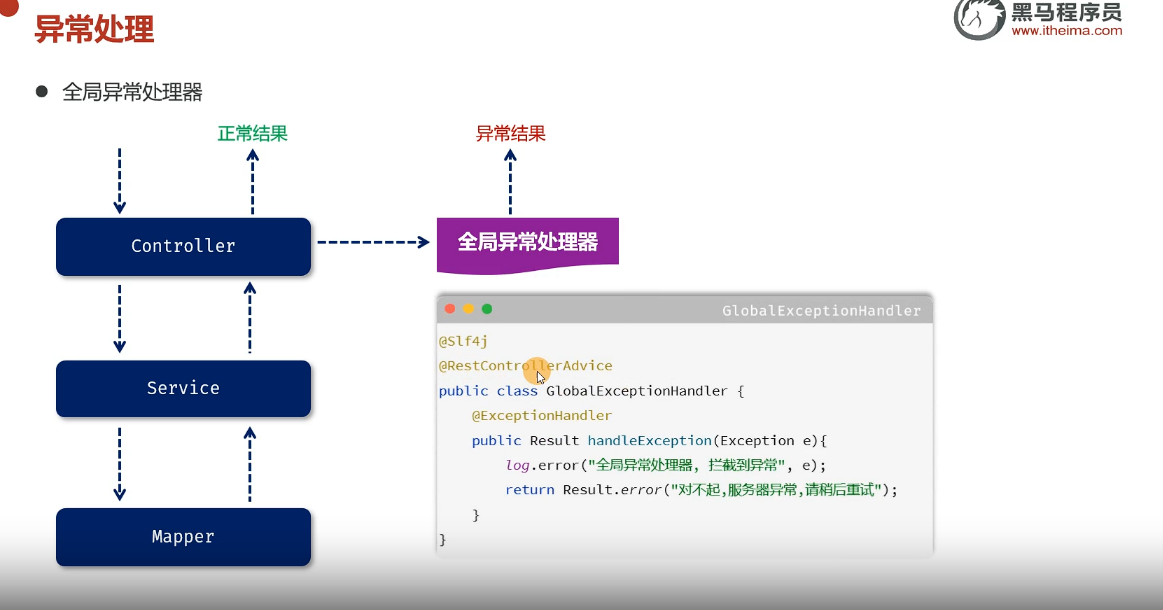
@RestControllerAdvice //加在类上 加强异常。和下面注解一起使用
@ExceptionHandler(Exception.class) //加在方法上,每个方法可以精准的处理对应的异常
具体代码实现:
@RestControllerAdvice
public class GlobalExceptionAdvice {            //写一个异常处理器,注意放在启动类同级目录下
    @ExceptionHandler(Exception.class)
    public Result allException(Exception e){    //所有异常
        e.printStackTrace(); //报错打印到后台
            return Result.error("服务器异常,请联系管理员"); //Result统一数据格式
    }

    @ExceptionHandler(DuplicateKeyException.class)
    public Result allException(DuplicateKeyException e){    //有重复值的异常
        e.printStackTrace(); //报错打印到后台
        if (e.getMessage().contains("emp.username")){
            return Result.error("您新增的用户名已存在");
        }
        if (e.getMessage().contains("emp.phone")){
            return Result.error("对应手机号的用户已存在");
        }
        if (e.getMessage().contains("emp.image")){
            return Result.error("对应手已存在");
        }
        return Result.error("数据已存在"); //Result统一数据格式
    }
}
效果如下:
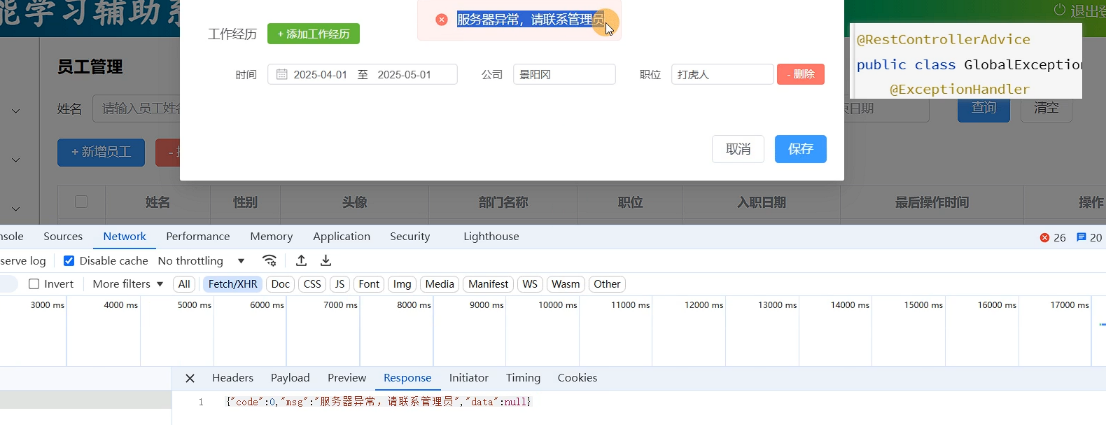
注意点:
全局异常处理器的包要 和启动类同级才能扫描到
推荐阅读:


文章有(0)条网友点评